If you were linked to this blog post on social media, you probably saw this image, and I’m going to show you how I automatically generate one of these for each blog post on this site using Astro, React, and Satori.
What is Astro?
If you haven’t heard, Astro is a web framework for building websites (especially static sites) using JavaScript. One of the unique and interesting features of Astro is we can use JavaScript/TypeScript to describe the build process for our site, without actually injecting any (or minimal) JavaScript into the built version of our site. If you are building a simple site or blog and were considering using a framework like NextJS, I’d recommend considering Astro, I used it to build this site!
While many of the concepts we talk about for generating open graph images may be applicable to most frameworks, we are going to focus on the quirks and specifics of getting this working with Astro.
Install dependencies
Install React for Astro:
pnpm astro add reactSee the official docs above for other install methods
Install Satori + Sharp + Gray-Matter
pnpm add satori sharp gray-matter- Satori: Converts React components to SVG images.
- Sharp: Image processing library for converting SVG to PNG.
- Gray-Matter: Parses front-matter from markdown files.
Dev dependencies
For reasons we’ll get into shortly, we will need to serve up our images in a local server during the build phase of our blog, so we’ll need a few tools to assist.
pnpm add -D serve wait-on kill-port- Serve: Serve static files from a directory.
- Wait-on: A simple tool to wait on our files to be served before progressing.
- Kill-port: Specify a port and kill the process listening on it. Useful in cleanup.
Create image as React component
We use React to make a component that we will render to an image for each of our pages. We design our image exactly as if it were a small webpage using HTML/CSS. We don’t strictly need React to achieve a similar effect, but Satori requires we pass in our component as a React component-like object, so we will create the component as a tsx file.
In your components directory, create a new directory named OpenGraph (or anything you want). We’ll need a createImage.ts file, and an OG.tsx component.
Create OG.tsx
OG.tsx is the actual React component that will be rendered to an image. This is where we will use the data from our blog post to generate the image.
Here is the interesting trick, in order to get a background image in our component, we either need to reference a URL, or use base64 encoded strings. I experimented with base64 encoding and my build took over 20 minutes. While running the Astro development server, your images are served via a local server. However, unfortunately, these images are not served during the build phase for Astro.
In order to set the background image, we will need to serve them separately during the build phase. We’ll come back to this but, create an image for your background in src/images/opengraph/ and we’ll reference the image from http://localhost:3001/opengraph/background.png, which we’ll talk about serving later.
export default function OG( title: string = "<Site Name> - Default Title", heroImageURL: string,) { const basePath = "http://localhost:3001/" const backgroundImageURL = `${basePath}opengraph/background.png`; return ( <div12 collapsed lines
style={{ display: "flex", flexDirection: "row", width: "100%", height: "100%", backgroundImage: `url(${backgroundImageURL})`, backgroundSize: "cover", backgroundPosition: "left", backgroundRepeat: "no-repeat", alignItems: "center", position: "relative", }} > <h113 collapsed lines
style={{ display: "flex", flexDirection: "column", flex: "1", padding: "2rem 4rem", fontSize: "5rem", textOverflow: "ellipsis", overflow: "hidden", fontWeight: "bold", color: "white", fontFamily: "Inter", wordBreak: "break-word", }} > {title} </h1> <div6 collapsed lines
style={{ display: "flex", flexDirection: "column", flex: "1", margin: "2.5rem", }} > <img src={`${basePath}blog/${heroImageURL}`}6 collapsed lines
style={{ width: "100%", height: "100%", objectFit: "cover", borderRadius: "24px", }} /> </div> // This places a logo on the bottom right of the image on the top layer. <img src={`${basePath}opengraph/logo-badge.png`} style={{ position: "absolute", bottom: "0", right: "0", zIndex: 100 }} width="146px" /> </div> );}I’ve included some of the styling I use in my images, but use this as a template and feel free to remove or add to it.
You can see we included two arguments to our component function, title and heroImageURL. The title will be printed on the left half of the image, and we will place a thumbnail of the blog post’s hero image on the right.
We will once again run into the issue of our images not existing in a local server during the build phase, so take notice of how we are using the heroImageURL as http://localhost:3001/blog/${heroImageURL} where we are only referencing the end of the path. We will once again serve these separately during the build phase and apply a few more tricks.
Create createImage.ts
createImage.ts as the name suggests will hold two utility functions that we’ll use to convert the component to an image.
import fs from "fs/promises";import satori from "satori";import sharp from "sharp";
export async function SVG(component: JSX.Element) {  return await satori(component, {    width: 1200,    height: 630,    fonts: [      {        name: "Inter",        data: await fs.readFile(          "./src/images/opengraph/fonts/Inter-Regular.ttf",        ),        weight: 400,      },      {        name: "Inter",        data: await fs.readFile(          "./src/images/opengraph/fonts/Inter-ExtraBold.ttf",        ),        weight: 800,      },    ],  });}
export async function PNG(component: JSX.Element) {  return await sharp(Buffer.from(await SVG(component)))    .png()    .toBuffer();}
Satori here is used to convert the React component to an SVG file, and Sharp to convert the SVG file to a PNG file.
We will need to supply at least one font to Satori. Unfortunately the best way to reference the font is to load the font from a local file that will be available during the Astro build phase. Find a suitable font and place it somewhere within the src directory and reference it with a relative path.
I opted to place these fonts in src/images/opengraph/fonts/. We will come back to src/images/opengraph/ in a moment.
Prepare blog posts
Include Hero Image in posts
One of the many benefits of Astro, is we can add type-checking to our markdown content front-matter. This allows us to require that blog titles be of a certain length, ensure a post has tags, or in our case, specifying the image we want to use for our “Hero” image (The main image of our post), which we will also use as a component of our Open Graph preview image.
For the path, use a relative path to the image. You may keep your images with your blog post content, so if your path looks different, that’s fine.
---title: A blog postheroImage: ../../images/blog/image.pngheroImageAlt: "some alt text for the image"---In my blog, this path is referenced in the layout for blog posts, but we’ll reference this same value later to get the name of the image we need when generating our Open Graph images.
This is the only part of the process that is typically not generated, of course if you are open to AI generated art, we could even automate this. I typically create my own images with Blender and Photoshop, but I do have a few posts with AI generated hero images.
Add image to collection schema
To keep our front-matter properly typed and take full advantage of Astro, we’ll add the a field for the HeroImage in our collection schema, which will also allow us to enforce things such as a minimum image size.
Luckily, Astro provides an [image helper for content collections(https://docs.astro.build/en/guides/images/#images-in-content-collections)].
import { defineCollection, z } from "astro:content";
const blogCollection = defineCollection({  schema: ({ image }) =>    z.object({      title: z.string().refine((str) => str.length <= 60, {        message: "Title must be less than 60 characters long!",      }),      ),      heroImageAlt: z.string(),      heroImage: image().refine((img) => img.width >= 1080, {        message: "Cover image must be at least 1080 pixels wide!",      }),      ),    }),});
export const collections = {  blog: blogCollection,};
Create static file endpoint
Astro uses a file-based routing system, where within our pages directory are files and directories matching the routes we want to serve. We could set a static image on most pages, but to generate and serve a custom image for each blog post, we can take advantage of Astro’s static file endpoints.“
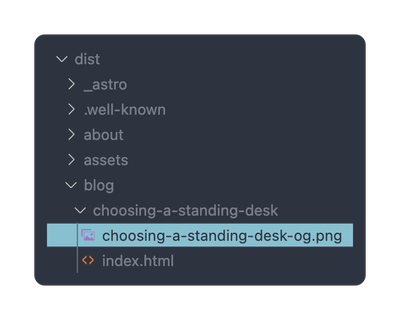
pages├── blog│ ├── [post]│ │ ├── [post]-og.png.ts│ │ └── index.astro│ └── index.astroThis will generate for us a URL structure where our blog post will live at: /blog/<title>/
And our image for the blog post will live at /blog/<title>/<title>-og.png
import { PNG } from "@components/OpenGraph/createImage";import OG from "@components/OpenGraph/OG";import type { APIRoute, InferGetStaticPropsType } from "astro";import { getCollection } from "astro:content";import fs from "fs/promises";import matter from "gray-matter";
export async function getStaticPaths() {  const blog = await getCollection("blog");  const blogData = await getBlogFrontmatterCollection();  return blog.map((post) => {    const postData = blogData.find((data) => data.title === post.data.title);    return {      params: {        post: post.slug,      },      props: {        title: post.data.title,        heroImage: postData?.heroImage.replace("../../images/blog/", ""),      },    };  });}
type Props = InferGetStaticPropsType<typeof getStaticPaths>;
export const GET: APIRoute = async function get({ props }) {  const { title, heroImage } = props as Props;  const png = await PNG(OG(title, heroImage));  return new Response(png, {    headers: {      "Content-Type": "image/png",    },  });};
const getBlogFrontmatterCollection = async () => {  const contentDir = "src/content/blog";  const files = await fs.readdir(contentDir);  const mdx = files.filter((file) => file.endsWith(".mdx"));  const frontmatter = mdx.map(async (file) => {    const content = await fs.readFile(`${contentDir}/${file}`, "utf-8");    const { data } = matter(content);    return data;  });  return Promise.all(frontmatter);};
Breakdown
export async function getStaticPaths() { const blog = await getCollection("blog"); const blogData = await getBlogFrontmatterCollection(); return blog.map((post) => { const postData = blogData.find((data) => data.title === post.data.title); return { params: { post: post.slug, }, props: { title: post.data.title, heroImage: postData?.heroImage.replace("../../images/blog/", ""), }, }; });}type Props = InferGetStaticPropsType<typeof getStaticPaths>;getStaticPaths() is a required function from Astro when we create endpoints, and it’s what will populate the [post] placeholder in the path with the title of our post.
Astro great ways to interact with our collections but unfortunately the heroImage URL returned by astro at build time will not be the value we entered, but instead the location of the image at build-time, which looks something like /_astro/abcdefg...png, which is another issue we have to solve for.
You can see we have a sort of copy of our blog’s data in blogData, which is where we actually get our Hero Image URL. Also take note that we run replace on the value to remove those ../ from the path, which wont be needed here.
const getBlogFrontmatterCollection = async () => { const contentDir = "src/content/blog"; const files = await fs.readdir(contentDir); const mdx = files.filter((file) => file.endsWith(".mdx")); const frontmatter = mdx.map(async (file) => { const content = await fs.readFile(`${contentDir}/${file}`, "utf-8"); const { data } = matter(content); return data; }); return Promise.all(frontmatter);};To get around the issue of Astro referencing the build-time URL, we manually search our files and parse the front-matter with gray-matter. We then return an array of the front-matter for each of our blog posts. This will allow us to get the true value of the heroImage url as we defined it, rather than what Astro changes it to at build-time.
export const GET: APIRoute = async function get({ props }) { const { title, heroImage } = props as Props; const png = await PNG(OG(title, heroImage)); return new Response(png, { headers: { "Content-Type": "image/png", }, });};Finally, GET is another required function of Astro static file endpoints, and this is where we define what data we want to serve and set the headers for our response. Here we create our image by calling the PNG function from our createImage.ts and pass it the OG component we created with the title and heroImage for the given blog post.
Add Open Graph Image to Head
Now that we know where our image will live after being built, we can reference it in the head of our site. We can add a few meta tags to inform search engines of the image we want to use for our site.
I’d recommend making a Head.astro component that we can re-use and supply custom values to.
interface Props {  title: string;  description: string;  ogImage: string;}const { title, description, ogImage} = Astro.props as Props;const permalink = new URL(Astro.url.pathname, Astro.site).href;const ogImageURL = new URL(ogImage, Astro.site).href;---
<head>
  <!-- Primary Meta Tags -->  <title>{title}</title>  <meta name="title" content={title} />  <meta name="description" content={description} />
  <!-- The rest of your head content -->
  <!-- Open Graph / Facebook -->  <meta property="og:type" content="website" />  <meta property="og:url" content={permalink} />  <meta property="og:title" content={title} />  <meta property="og:description" content={description} />  <meta property="og:image" content={ogImageURL} />
  <!-- Twitter -->  <meta property="twitter:card" content="summary_large_image" />  <meta property="twitter:url" content={permalink} />  <meta property="twitter:title" content={title} />  <meta property="twitter:description" content={description} />  <meta property="twitter:image" content={ogImageURL} />
</head>
These images will only exist after the build phase, so we unfortunately will not be able to preview them in the local server, but we can verify they are created in the dist/ directory and validate that the astro dev server is attempting to reach an image at the correct location.
Add Build Scripts
We are nearly done, we just need to resolve the issue of our images not being found at build time. We already set our base image path in our OG.tsx to http://localhost:3001/, so we just need to add a few scripts to package.json to resolve these paths properly during the build phase.
{ "scripts": { "build": "pnpm run build-setup && astro build && pnpm run kill-assets", "build-setup": "pnpm run serve-assets & pnpm run wait-for-assets", "serve-assets": "serve -p 3001 --no-port-switching ./src/images", "wait-for-assets": "wait-on -t 5000 http://localhost:3001/opengraph/background.png", "kill-assets": "kill-port 3001 || true" }}The build script is modified to first serve our images on a local server on port 3001, then wait for the images to be available before building our site, and finally kill the server after the Astro build completes.
If the Astro build ever fails for some reason, you can run pnpm run kill-assets to kill the asset server and try again.
Conclusion
There we have it! On every build of our site now, each post will get a custom Open Graph image, hopefully driving better click rates on our posts, by offering a more enticing preview of our content.
From a technical standpoint, this was not as straight-forward as it could have been due to the way images are handled differently during the build phase in Astro. The next step may be to open an issue on the Astro repository to report the use-case and and share this workaround with the dev team. If anything gets updated to make the process easier, I’ll issue an update at the top of the post.
Remember, if you want to dive deeper into the code or anything else on this blog, the code is fully open source. And join the newsletter!